Moving Off of Netlify
Ever since I started this blog 3 years ago back in 2022 I’ve hosted it on Netlify. Here is my first post whining about how difficult it was for me to set that up.. Looking back after having a better understanding of both Hugo and Netlify, my complaints are pretty dumb. I’ve learned from certain mistakes like using GitHub submodules unnecessarily and being able to read docs better.
My newest complaint however is a bit more valid. I’ve been reading more and more regarding AI scrapers and was curious what kind of bot traffic my blog was receiving. So I go on Netlify and look around for logs. Can’t find any kind of access logs. Find out that Netlify does offer logs, however they are on their paid plan, and they do not provide really the level of detail compared to logs from like nginx. Since I already self host a VM running nginx, I decided I might as well throw that on it too. I’ve also starting building up monitoring for everything in my home lab. Lots of messing around with SNMP (I hate it) and Grafana’s LGTM stack. My overall plan is to eventually create some kind of primitive NOC & SOC.
To transfer my blog over to being 100% self hosted, I’m just going throw it onto the nginx server and add it as another vhost. I have nginx installed on Ubuntu so I use the sites-available & sites-enabled approach to setting up and organizing my vhosts. Appearently some people have strong opinions on this. And instead of serving this under the reverse proxy like the rest of my vhosts are, I’ll just have nginx directly serve the files here.
Under sites-available I created broderic.blog and entered in a simple config:
server {
    server_name broderic.blog www.broderic.blog;

    root /home/nginx/New_Broderic_Blog/public;
    index index.html;

    location / {
        try_files $uri $uri/ =404;
    }

    error_page 404 /404.html;
    location /404.html {
	    internal;
    }
}
I then updated my domain to use my registrar’s nameserver, which I have full control over. And then created a CNAME record pointed toward my DDNS domain, which points to my router’s public IP.
Back on nginx, I created a symbolic link for my broderic.blog config towards the sites-enabled directory, so my site is now ready to go live:
ln -s /etc/nginx/sites-available/broderic.blog /etc/nginx/sites-enabled/
I’m just missing one last thing, encryption! Thankfully, this is free and extremely easy to implement with certbot and Let’s Encrypt!
sudo certbot -v --nginx -d broderic.blog
Confirm my config is good with nginx -t and then systemctl reload nginx
And now my site is live, hosted from my own server!
I have a new issue though which is since my site is no longer on Netlify, I can no longer us its CI/CD pipeline integration it had with Github where it would automatically pull new content and update my site for me. Now, whenever I update the content of the site, I would have to upload the files to nginx each time. I need to set up a new way for when I push to the Github repo, nginx will pull the new content, thus updating site content automatically.
The way to do this is with Github actions, but within Github actions there are different ways of implementing this. I don’t have any kind of CI/CD background, so I asked good old AI for some help. It recommended I use ssh-action which would allow Github actions to directly execute remote commands to my nginx server over SSH and thus pull new blog content automatically after each upload. But after thinking about this for a bit, I decided to do more research since I didn’t really like the idea of having to expose SSH on my server. I also thought it was kind of an insane thing to do regardless.
I asked AI some more and it finally recommended using self hosted Github runners. This isn’t to say that a self hosted runner would be immune to any vulnerabilities. I just trust Github’s own solution vs “semi-official” solutions from what appears to be third parties.
Setting up a self-hosted runner is pretty easy. Github provides the small handful of commands needed to start up the runner. I set up my runner on a separate VM, so now all I needed was to create an SSH key pair with ssh-keygen so it could SSH into my nginx server and actually execute the SSH commands. Then under my Github actions workflows I added this yaml config:
name: Update Broderic Blog

on:
  push:
    branches: [main]


jobs:
  deploy:
    runs-on: self-hosted

    steps:
      - name: Deploy on nginx
        run: |
          ssh nginx@10.10.19.8 'cd /home/broderic/New_Broderic_Blog
          && git pull && hugo --minify && sudo systemctl reload nginx'
ssh nginx@10.10.19.8 'cd /home/broderic/New_Broderic_Blog && git pull && hugo --minify && sudo systemctl reload nginx'
This SSH’s into my nginx server, pulls the new updates from the repo that were just pushed, builds the new Hugo static files with hugo --minify, and then reloads nginx to apply changes.
The final step now is to add the nginx access logs to Loki and then from Loki to Grafana. I first need to update my nginx log format to a key value pair so I can use Loki’s logfmt to parse the logs correctly.
To keep things simple I am just going to edit the http block under my nginx.conf, instead of setting up logs individually per site. nginx allows you to format logs in kinda whatever way you want. I referenced this list of nginx variables for what I could actually log. I ended up with this as my log config:
log_format kv
    'site="$server_name" '
    'src="$remote_addr" '
    'src_ip="$realip_remote_addr" '
    'user="$remote_user" '
    'time_local="$time_local" '
    'protocol="$server_protocol" '
    'http_method="$request_method" '
    'uri_path="$uri" '
    'uri_query="$query_string" '
    'status="$status" '
    'bytes_out="$bytes_sent" '
    'http_referer="$http_referer" '
    'http_user_agent="$http_user_agent" '
    'http_x_forwarded_for="$http_x_forwarded_for" '
    'request_time="$request_time" '
    'response_time="$upstream_response_time"';

access_log /var/log/nginx/access.log kv;
I already have Loki and Grafana up and running, so all I needed was to run and set up Grafana Alloy on my nginx server to send them to Loki, and then from there Grafana can read and query the logs.
Running this query in Grafana: {job="nginx"} | logfmt, it successfully identifies the log fields!
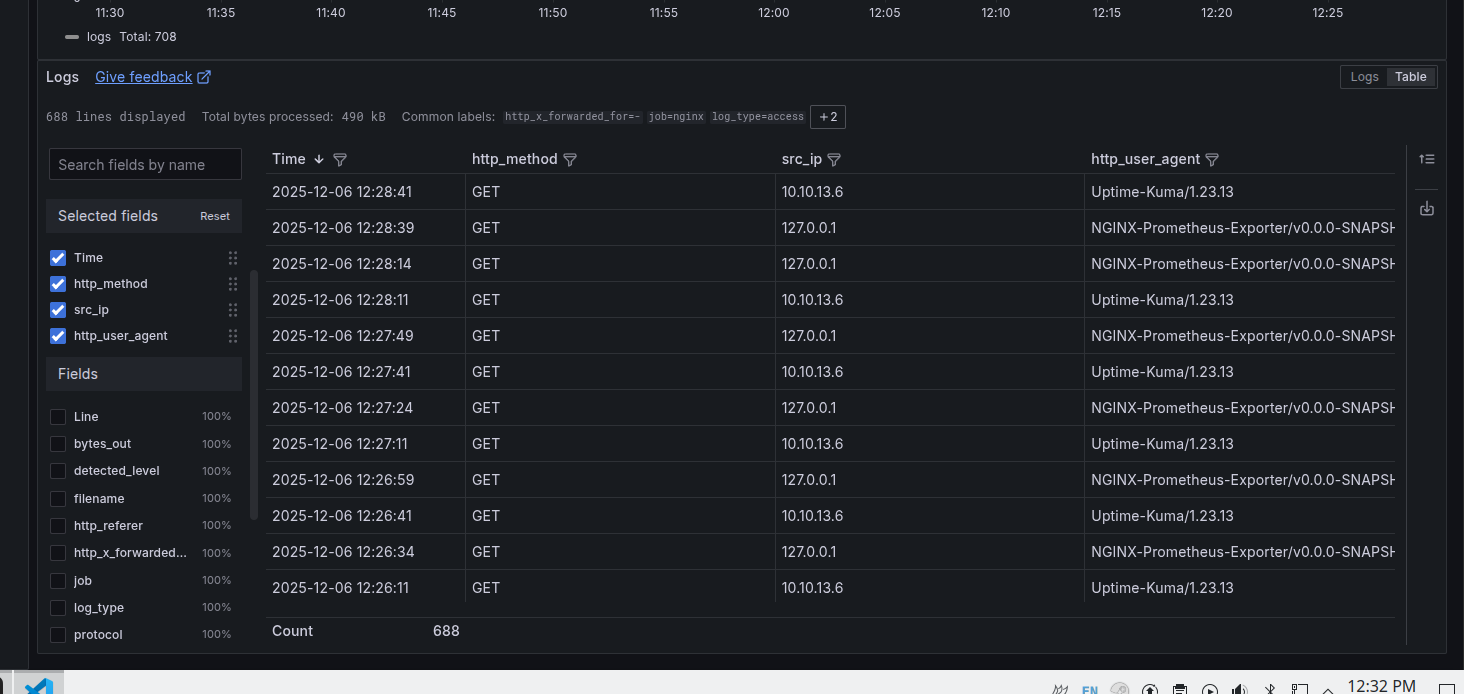
I wanted to filter out all local traffic, and thankfully LogQL has an ip option which makes this easy to do:
{job="nginx"}
  | logfmt
  | site="broderic.blog"
  | src_ip != ip("10.0.0.0/8")
  | src_ip != ip("172.16.0.0/12")
  | src_ip != ip("192.168.0.0/16")
  | src_ip != ip("127.0.0.0/8")
From here I can calculate which IPs and user-agents are hitting my server the most.
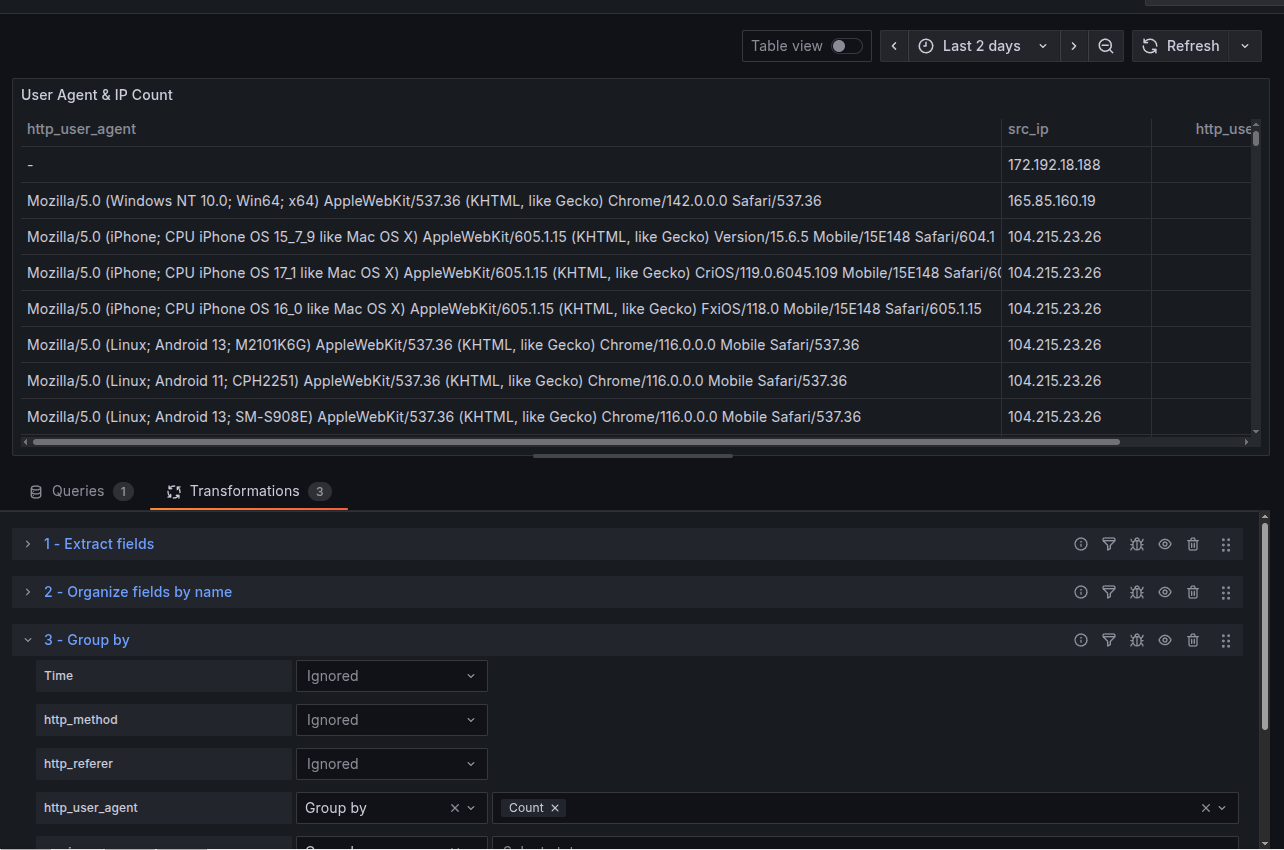
Here’s a dashboard I was able to create showing most common IPs, user-agents, and both combined. The combined panel allows me to correlate similar activity between both IP and user-agent. Can see IP 104.215.23.26 rotating user-agents.

As someone who is more used to Splunk’s SPL and Microsoft’s KQL, Grafana’s LogQL is kind of a PIA to use. I could not do everything within the query itself since some transformations are only possible through Grafana’s transformation section, which is external to the actual query. It’s simply not as intuitive compared to using something like Splunk’s stats count by x.
I’ve had log collection going for about 2 days now, and my top “official” AI scraper is from Meta, with 42 requests:
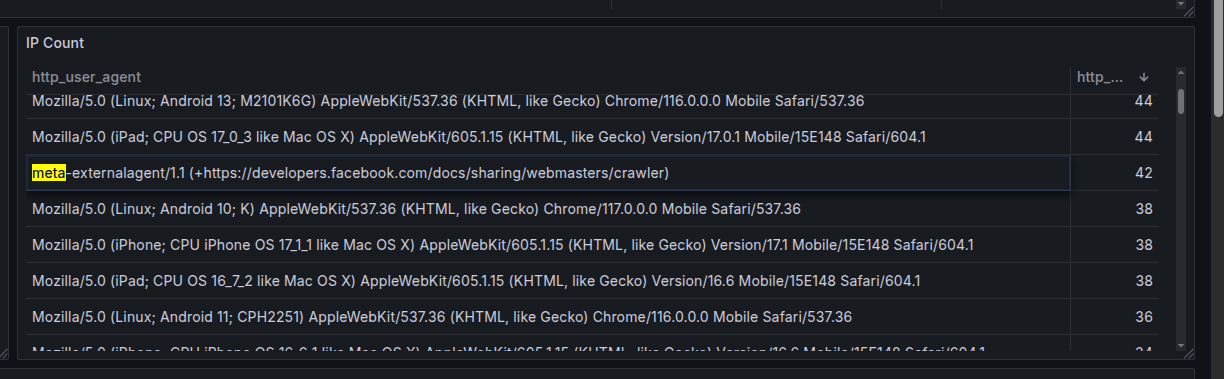
And here’s my full list of self identifying bots so far:
| Bot | Requests | Webpage |
|---|---|---|
| Meta | 42 | https://developers.facebook.com/docs/sharing/webmasters/crawler |
| PetalBot | 25 | https://webmaster.petalsearch.com/site/petalbot |
| AhrefsBot | 14 | http://ahrefs.com/robot |
| OpenAI | 12 | https://openai.com/searchbot |
| SemrushBot | 10 | http://www.semrush.com/bot.html |
| DuckDuckBot | 9 | http://duckduckgo.com/duckduckbot.html |
| THRILLHO | 8 | https://harrison.page/thrillho |
| Amazonbot | 6 | https://developer.amazon.com/support/amazonbot |
| CensysInspect | 5 | https://about.censys.io |
| bingbot | 5 | http://www.bing.com/bingbot.htm |
Surprising to see so much bot activity from just 2 days of logs. I’ve had this site up for multiple years, yet the same bots are relentlessly hitting the site. The activity overall isn’t too surprising for me as I don’t even have a robots.txt set up. Once I add that, then we can see who actually plays by the rules. The main goal of this was mostly curiosity. I just wanted a better idea of who was visiting the site and what kind of requests were being made. This is however also the first step toward blocking the bots. I may add more nginx configs and Fail2Ban to get rid of them, but this site isn’t mission critical so I don’t really care.
I do plan on doing some more investigations on what the best actual method is to block bots. They have been becoming a legit issue as the AI companies scrape the entire web indiscriminately. Bots though, have pretty much been an issue since the beginning of the web. I look forward to my future battles with them.